- Connect EC1 to carriage and power
- Turn on; it should beep
- Inspection light ON
- Set card in reader and to correct row/width
- Select needles to be worked on
- Set cam to 0 (stocking stitch)
- Set Russel levers to II (normal)
- Set side levers to triangle (if you have them – the SK840 doesn’t)
- Disengage weaving brushes
- Set the point cam and end cams as required
- Cast on and knit a few rows, ending COR – alternatively, if knitting is already in progress, pop the top and do two free passes to memorise the cam positions
- Select pattern switches as required
- Turn inspection light OFF – EC1 should memorise first row
- Set cam to pattern eg F, T
- Continue to knit

My addiction to anything crafty created with a pointy stick, a needle or a hook.....
Wednesday, August 31, 2011
Quick guide to pattern knitting with the EC1
Bad luck comes in threes?

Nope, not dead. This was my view all last week. Spent most of it sunning myself on the shores of Camp De Mar in Mallorca. I have some interesting tan lines. Didn't take any knitting with me as I couldn't figure out what would be portable. Weather was fantastic - 28 degs most days, and hardly any cloud (this photo was taken quite early, it had burnt off by 11am). The only minor downside of the holiday was that the hotel entertainment was loud cabaret every night until 11.30pm - and it being on the poolside terrace, and the bay being quite small - you couldn't exactly get away from it. Even with the doors shut and the television on, you could still hear it. I'm not a great fan of staying up late getting plastered - I'm afraid I'm a lightweight and tend to fall asleep! :) Apart from that, the holiday was lovely and I've eaten far too much food!
Back to earth with a bump on Monday - cold and overcast, had to pop to Sainsers en route to buy fresh food, had to run and hide in the car when himself spotted someone I really don't want to talk to right now. The cat was secretly rather pleased to see us, although he has figured out that G's brother (the cat sitter) lives over the road so he now goes over there to beg to be let in/fed. I got a rather disgruntled 'phone call saying he seemed to have our cat and could we get him before he peed up something - Thomas loves to mark his outdoor territory!
Today I managed to leave my mobile at home (which isn't a disaster but makes me feel kinda naked and disorganised). On the way to work a large stone skipped across my windscreen and 10 seconds later it was a 10cm crack - in fact, it's only the heating element stopped it going further - so I've already spent £75 on insurance excess today. Thank goodness it's payday! Last night I tried and failed to get my new-fangled and blooming expensive SK860 to talk to the EC1 patterning device - so I have a rather elaborate doorstop for a knitting machine. I've got some things to investigate tonight when I finally do make it home around 10pm - otherwise the carriage will need to be serviced. I tried swapping magnets, swapping cables, different combinations etc - and the EC1 functions perfectly well on the SK840 so I think it might be the carriage. Weirdly enough, I DID get fairisle out of it last week - but it took me a few attempts. Remember I had difficulty getting fairisle patterning on the main body? It took me several attempts. That was the first indication that something was amiss. Apparently there are some magnets at the front of the carriage that move about and tell the electronics I've changed direction, so perhaps something is sticking. I hope so, because replacing the EC1 would be very difficult.
They say these things come in threes, and as I'm not sure the leaving mobile at home quite counts, I'm just a bit nervous as to what will come next!
Current mood: grumpy
Current mood:
grumpy Saturday, August 20, 2011
Friday, August 19, 2011
Principles of Ribbing Cast-on in Machine Knitting
The principles of a ribbing cast on is always the same for Japanese machines:
1. Arrange needles for your desired rib.
2. Knit 1 zigzag row (set both beds to knit). Hang cast on comb and weights symmetrically.
3. Knit 2-3 circular rows - this means set the main bed to slip left and the ribber to slip right (or the other way around, as long as one carriage slips in the opposite direction to the other).
4. Knit another row with both beds set to knit - this is row 1.
There is also a step 1.5 and 3.5 which are not always necessary:
1.5. If you want to do a 2x2 rib, or any rib that has two or more stitches on the main or ribber bed together, you set the needles up first and then rack 1.5 positions before the zigzag row so that the needles are arranged KPKPKP (knit purl etc) - you cannot start with KKPPKKPP as it will not work - on the next pass KK and PP will become one great big stitch, and disaster will ensue! You may have to add a stitch at one or both ends to keep the alternating pattern consistent.
3.5: Rack back again to the original position. If you added any end stitches at step 1.5, now is the time to decrease them again.
NB: to do a wide rib such as 5x5 you would have to rack a LOT of positions to make this work, and the yarn would probably not stretch enough to make it possible to rack back when you get to step 3.5. In this case, it's better to do steps 1-3 for 1x1 rib and then transfer your stitches between beds for your desired rib. The selvedge (circular) rows will barely be visible in the finished welt.
Edit 30-09-2013: See also Ribbing cast on cheat sheet for sketches comparing Brother to Knitmaster
Wednesday, August 17, 2011
Table of machine needle sizes
I'm working on a spreadsheet of machine needle sizes - measuring total length, centreline of butt to end, and the height of the butt. I'll not share the live spreadsheet here just now because it's a work in progress, but if you think you can help me with missing machine(s) or data, please leave your measurements in the comments. It'd be much appreciated!
This is the document so far. I am hoping to add to it in the future.
Monday, August 15, 2011
Knitting with the lights out
Good weekend. I was booked on the final pattern drafting course with the English Couture Company, but it was cancelled due to lack of numbers. So it meant I had a whole weekend blocked out in my diary, to do with as I wish! Might sound daft but that doesn’t happen very often! As himself needs to make up the hours this week to offset holiday time (he’s a sub-contractor), it meant I had a whole day and a half to amuse myself in. Maybe I should book more weekends for myself like that, ho ho!
I’d managed to get two Ravellers combined into one, in my small hazelnut of a brain last Wednesday - (sorry Unsure and Covknit!) so had accidentally given some vintage Knitmaster items to the former when they were actually for the latter. Luckily Unsure was happy to meet me in Coventry to give them back – I went straight to Covknits and we got to grips with her machines. Hubby had bought her a vintage Knitmaster (the kind with sinkers) and before he knew it, three more turned up – two sinker-type and one modern punchcard. Although the Knitmaster 4500 was interesting to me from a mechanical point of view, the carriage had had some damage and it wasn’t being consistent when doing partial knitting. Owing to its design, one has to lay yarn into open latch hooks on every row – in fact, it works rather like an intarsia carriage on the modern machines – and if one latch is shut, or you miss the ideal “slot”, you’ll have either a dropped or slipped stitch. The advantages with this machine are it can knit straight from a ball (because it is by your feet) and the spring-loaded sinkers push down on the knitting so no weights are required. The disadvantages, apart from those listed above, is that getting spare needles or repairs will be almost impossible, and any patterning would be manual (although we didn’t try patterning).
So anyway, I suggested that we got to grips with the 323, which isn’t nearly as scary as it looks. Turns out Covknits has got pretty much everything you can get that goes with that machine, with the exception of a lace carriage (and I’m not sure if one was made for that machine – early Knitmasters had inflexible needles). She’s also got some Brother bits which are no use at all to her. I worked through my crash course leaflet - could have spent all day chatting – and Covknit’s hubby kindly made us lunch, too. Despite the parlous state of her needle retainer bar the machine coped admirably – we even got fairisle and tuck out of it, and accidentally, teacosy stitch, when I forgot to unlock the card – it was supposed to be slip!! :D
Sunday the Cog decided he’d work another half day, so I pottered about on the Passap. I’ve managed to get a copy of the old Duo 80 manual from a fellow Guild member, which actually has lessons in – and they all make something “useful”. No need to switch on the electronics.
The first exercise is an exercise in various K/K ribs (fishermans, half fishermans, long stitch, FNR) with some decreasing and increasing in the middle. It’s supposed to make a “mitt” but I was using leftover sock yarn so reduced the amount of rows – it could make a purse, I suppose. I finally nailed the cast off – it’s done between the beds by transferring all to the front but leaving the back bed in work, knitting a slack row, pushing the knitting towards the back and then latching through the loops at the front. Last time I tried it, I must have done something wrong because it immediately came undone.
The second exercise is the back of a batwing jumper for a toddler, mostly in stocking stitch. I was going great guns until the yarn snapped and the whole thing fell off. Will have to restart I think. I never had a Duomatic, but the manual for the E6000 is aimed at upgraders not beginners, and there were no lessons in it, so I think it’s a worthwhile exercise.
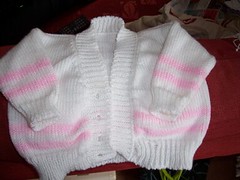
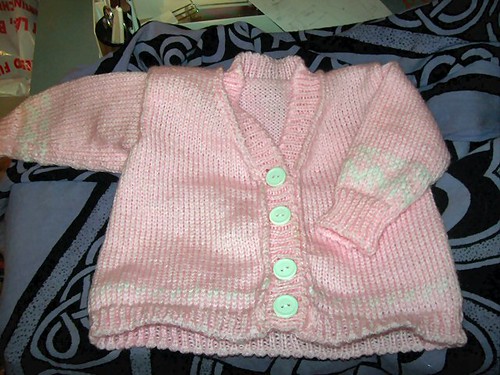
After lunch (himself home and dozing off on the sofa) I knitted a little pink cardigan in my Easy DK pattern – accidentally did the fronts/back with the prototype measurements so guessed the V neck decreases. I was testing the electronics on the SK860 for the first time – at first the card refused to move so I got a strange pattern on the fronts/back – had managed to fix whatever it was that was wrong by the time I got to the sleeves, but didn’t do all-over fairisle as planned because the inside floats were longer than I thought they’d be. Also managed accidentally-on-purpose to mount the button band the wrong way around – so there’s a not-very-tidy ridge all around the fronts. Interesting, but I shan’t do it again. The cardigan is for a friend’s new arrival – I have been so busy that apart from registering my congrats on Facebook I’ve not acknowledged the birth – and figured, this is more useful than a belated card.
It’s the most machine knitting I’ve done for myself for ages, it seems, and I really enjoyed it! Except for the unpicking of mis-patterned fairisle…
It’s the most machine knitting I’ve done for myself for ages, it seems, and I really enjoyed it! Except for the unpicking of mis-patterned fairisle…
Friday, August 12, 2011
FO: Intarsia waistcoat (back)
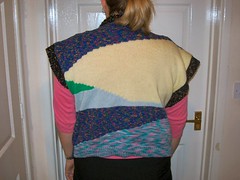
100_4070
Originally uploaded by steel breeze
This is the back. Debating whether to swiss-darn something on the back, or leave as-is.
FO: Intarsia waistcoat (front)
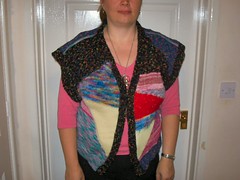
100_4069
Originally uploaded by steel breeze
Just a bit of fun doing intarsia using holding position on the SK860 midgauge. Needs buttons (although I rarely button up unless I'm cold).
Wednesday, August 10, 2011
History of Toyota Knitting Machines
Found a folder full of interesting knitting history in amongst the stuff I am selling for a friend. Thought this might interest the Toyota owners (not sure if the machine history is complete):
Company Profile
Aisin Seiki Co Ltd, founded in 1949 as a manufacturer of automotive parts and sewing machines, has since grown into a principal international supplier of components for engines, driving systems, suspension, brakes, clutches and bodies, as well as home appliances and industrial machinery.
An important member of the Toyota Group, which supplies parts to the Toyota Motor Corporation, Aisin is also known for its strong independence. For home use, Aisin manufactures knitting and sewing machines, electric appliances, and beds: for industrial use, it makes precision metal molds, large transfer machines, and sewing machines.
Aisin’s intensive research and development continues to produce new products and improve on existing ones, such as metallic fibres, cryogenic freezers, the Stirling engine, and a drive unit for artificial human hearts.
As leader of the Aisin Group, which comprises eight affiliated companies in Japan, Aisin confidently offers innovative high-quality products and home and internationally. The company has nine subsidiaries overseas and one affiliate each in North America, Latin America, Europe, Southeast Asia, and Oceania.
History of Toyota Knitting Machines
1954 Model NT10 - pitch 5.5mm, 170 needles, sliding handle, hanging weights style. Single knitting machine of needle orerating type
1955 Model MT20 – pitch 4.5mm, 170 needles, sliding handle, one ste bed dropping, one pitch swing. Double bed knitting machine
1959 Model K202 – 180 needles, two step bed dropping, 10 pitch swing, 3 colour changing device. Double bed knitting machine
1960 Model K104 – 210 needles, wide stainless steel bed, fixed handle, non-hanging weights style. Single bed knitting machine
1962 Model K106 – needle selection mechanism built into the carriage. Single bed knitting machine
1965 Model 109 – needle selection mechanism built into the carriage, limited number of needle selections. Single bed with pattern trace knitting
1969 Model K600 – needle selection mechanism built into the carriage, 12sts in one punchcard, built-in weaving pattern device, lace carriage. Single bed with easy operation of fairisle knitting
1971 Model 700 – single bed knitting machine with knit tracer (optional)
1972 Model 210 – pitch 3.63mm, 252 needles, two step bed dropping. Double bed knitting machine
1972 Model KR450 – pitch 4.5mm, 200 needles, step bed dropping. Rib knitting machine.
1977 Model KS787 – Carriage needle selection mechanism, 24 stitches in one punchcard, manual selection of 12 stitches, motif magic, attachable knit tracer. Single bed knitting machine
1981 Model KS901 – Carriage needle selection mechanism, 24 stitches in one punchcard, lace carriage needle selection, motif magic, extended pattern, transferring stitch lace by lace carriage
1981 Model KR501 – two yarn feeders, fold down style handle, built-in feature called Simulknit (no slack yarn on the back).
Edit 7-6-2024: There are lots of manuals for Toyotas here
Monday, August 08, 2011
Hurrah!
Finally finished the Dream Week project this weekend. It came out quite well, although I did have to resort to fabric glue near the end. I will be taking photos at some point, of course.
Now I can relax and get on with some non-deadline knitting - adding a 2x2 rib to a Passap sock I made last week as part of a demo, for example. Finishing off the loud intarsia waistcoat, for another.
Ironically, just as I've finished a major project, a whole weekend has become free owing to the cancellation of the last pattern drafting course. I'm sure various chores will expand to fill it, though - they usually do!
Subscribe to:
Posts (Atom)