Showing posts with label maintenance. Show all posts

Sunday, August 18, 2024

Just press play

Well, it's been an interesting few weeks, none of which had to do with my creative side - it does stop my creative side from happening though. And no, Anonymous (previous post), I didn't invent the Ravellenic games just for fun. Someone at Ravelry came up with it quite a while ago. It was originally called the Ravelympics until a ceast and desist from the IOC meant a name change (though they did later apologise, you don't want to mess with outraged crafters!). For my part I'm sure the Greeks would be on our side, Mount Olympus being a place, but rules is rules, and Ravellenic was voted the most popular alternative title. It's now all rather ironic seeing as Tom Daley shared a post of another lovely sweater he made during the games, though I do think he needs to learn the difference between intarsia and fairisle. The floats he gave himself around the lower edge of that sweater for the various flags are just begging to get snagged on fingers and pulled out of shape! So anyway, the Ravellenic games run alongside the Olympics; the idea is that one casts on during the opening ceremony, should it concur with your time zone, and to challenge oneself to complete at least one project before the closing ceremony. No monetary prizes are awarded, it's all just a bit of fun, and the "medals" for tagged events (eg sock heptathlon, sweater long jump) and "laurels" (for specific techniques eg beading, cables) are just fun pictures to save, download and share. The machine knitting team named itself Team Rise of The Machines after the Terminator movie of the same name and it stuck... and I usually design the team logo just because of my background in graphics.  

Incidentally, the title is a sideways tribute to one of my favourite songs, by one of my favourite bands. I was sorry to learn that Aerosmith is no longer touring due to ongoing problems with Steven Tyler's voice. There's a price to pay for being the Demon of Screamin', alas. 

Anyroad, thanks to the mental funk, I've just not felt up to doing much - couple that with a 10 day heatwave, and manhandling yarn in an upstairs room that feels like it's doubling as a pizza oven just isn't my preferred way of spending time. 

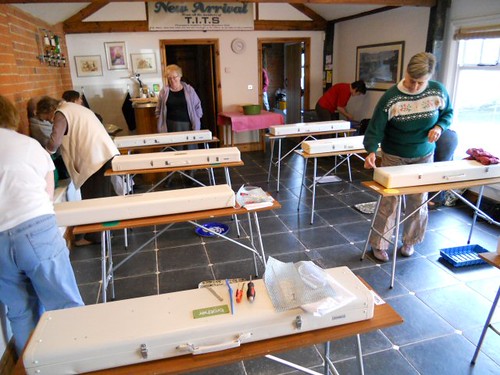
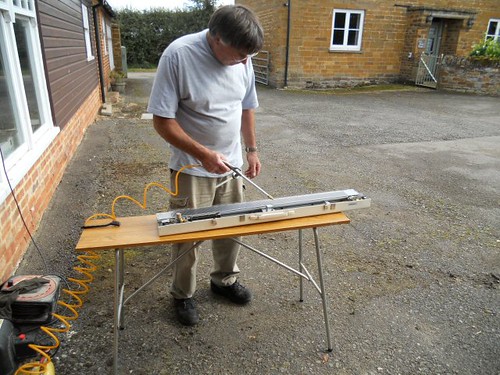
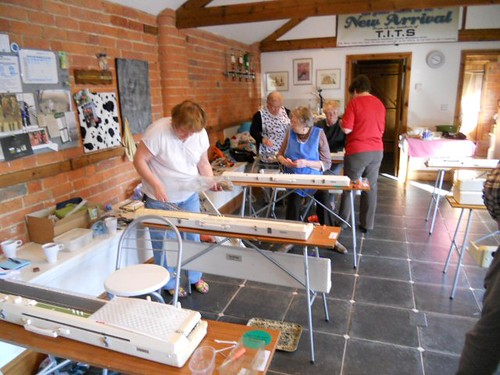
My good friend C recently gifted me with one of her Ebay purchases - a Knitmaster 260k machine. It was naked of everything except its empty accessories box, so I'm gradually putting it all back together so it can become a second workshop machine. I discovered to my chagrin last week that Brother and Knitmaster C clamps are NOT interchangeable - the latter are thinner, so the Brother ones literally won't slide into the slots. I scrambled, as my monthly club meeting was about to start, and used the ribber clamps from my SRP60N in the end, mostly because accessing the ribber box was quicker than trying to dig out the SK840 itself (and one of those clamps keeps falling off anyway, I think the thread is worn beyond repair). So after last week's disastrous attempt to demonstrate machine lace (the lace carriage drums were seized, all good again thanks to one of Ask Jack's great videos!), I thought it was time to put the machine through its paces. Alongside all that, I rediscovered a box of punchcards acquired from an estate sale. They're in one of those old vinyl boxes, very similar to the much beloved cases of my late father and his audio cassette collection. Reading the manuals (something I fail to do as often as I should), certain devices call for the ribber clamps anyway - my YC6 seems to have a single ribber clamp in the box, no idea where the other one is! 

PXL_20240817_130824152 PXL_20240817_130749261

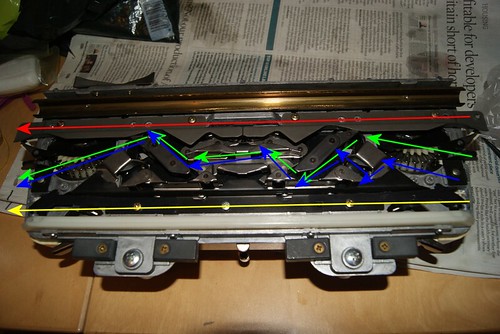
Anyway, the first card up was a hand-punched card that just said chunky slip 901. It was mostly holes but with some unpunched alternating strips. It knits a very striking slip stitch fabric, somewhat akin to holding position in random places (but holding creates tucks, slip just means the stitches stay hanging on the machine whilst knitting happens around them). I think there's a version of this called "tea cosy stitch", which was how those old traditional striped tea cosies were knitted. It works well as long as you never have end needles slipping, because things hanging up on ends is a bit of an issue for weighting reasons.

PXL_20240817_115722210 PXL_20240817_115732357 PXL_20240817_115934051

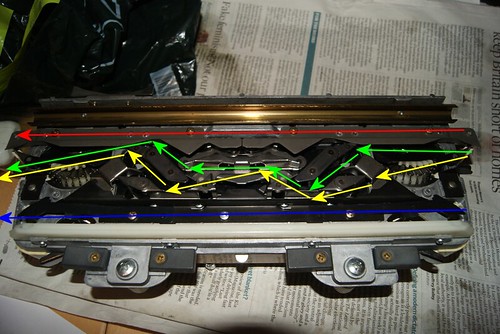
Second up was a mystery card - it said two colour single bed slip, but other than trying to read the pattern or enter it into DAK, the quickest way to read it is to knit it. After about 20 rows being one row out, I discovered someone had attempted to replicate a fairly standard dogtooth check pattern - alas the pattern had errors, so went into the bin. Single bed slip like this is a not-often used technique, only Passaps have to do fairisle like this because they've only the one yarn feeder in use at a time. 

PXL_20240817_130528105 PXL_20240817_130904463 PXL_20240817_130540141

The third card was a bit of fun - I've two very long cards punched with dragons and yin-yang symbols. I'd like to transfer this into DAK and do some float control. Or this could be a great technique for ladder back DBJ - something I need to explore more! This would make an amazing sweater, I do wish I had some provable Welsh or Japanese ancestry!

PXL_20240817_143815180 PXL_20240817_141139596

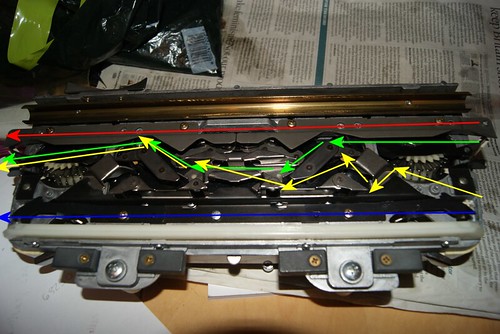
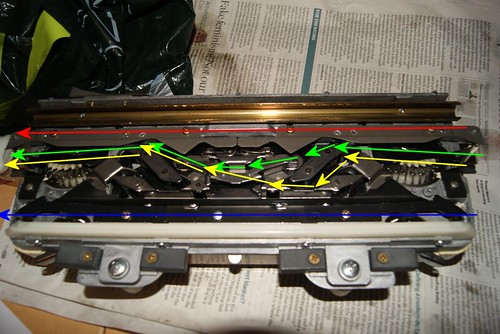
Pulling the leading end needle out forces the second yarn to knit to the edges and eliminates tangles and other problems. 

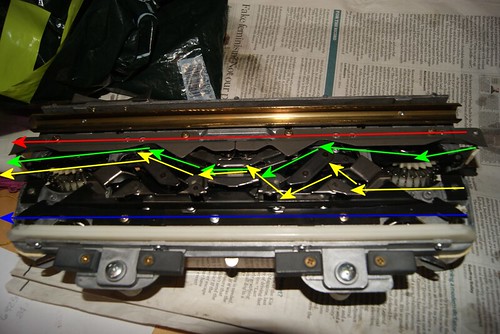
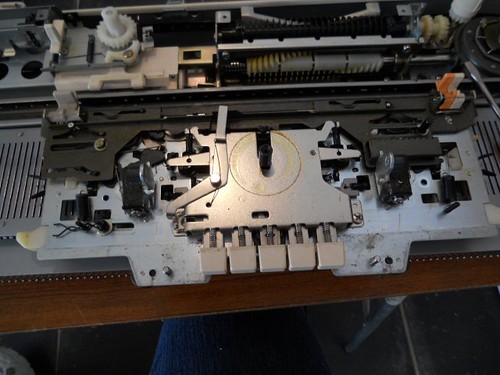
The final card was a bit of a punt. The machine in question came with no punch cards, and although I've got a set which will work with the main bed, the lace cards I thought I'd found for it turn out to be for a two carriage lace system, and I couldn't find any Knitmaster lace cards to try. I eventually found a card someone had punched which at least proved that the lace carriage is now working. I've a dodgy needle to remove, and all of the needles need removing and soaking, but it was, all in all, just what the doctor ordered in that it got my crafting mojo back a bit, even as far as filing some of my new samples into my lever arch collection! :) Next task, asides from the needle cleaning, is to test the machine with the ribber!

So, if you're in a crafting funk - just push play. The clouds may lift sooner than you think! 

PXL_20240817_145902554 PXL_20240817_145907642


Current mood: okay

Saturday, April 06, 2024

Knitting Machine Maintenance notes

I was lucky enough to attend a talk recently by Neil Collison, of Knitting Machine Repairs, at the Long Buckby machine knitting club, and took these notes. Hopefully they will help others who for reasons of geography cannot use Neil's excellent services. I left my faulty garter carriage with him - it would sit on the bed and make all the right noises, but only knit a few stitches and then sit there chugging away and not moving. He returned it very quickly and replaced a circuit board. The only hitch in the whole transaction was that my email provider refused to accept his, so invoicing ended up being done via Whatsapp!


Brother sinker plate


  • Remove yarn from around brushes

  • Brush wheels can be replaced with rubber ones

Lubricants

  • Gun oil (not bore oil)

  • Sewing machine oil

Retainer bars

  • Spartan or Andeeknits in the UK, they are ordered in bulk from Germany

Maintenance steps

  1. Push needles to UWP, use clean paintbrush to brush out the needle strip area and the back rail area

  2. Run a finger along the needles, the latches that don't drop back are bent

  3. Open all latches, push down quite hard. Use a piece of paper to flick the latches shut.

  4. Return the needles to A position. Stroke along whilst pushing forward, this checks the needles for straightness

  5. If any needles get jammed low in their channel, you may need to release the patterning belt to free them.

Cleaning

Neil uses a solution of 2 parts iso propyl alcohol to 1 part surgical spirits. This is used to soak stuck components eg stuck buttons (requires some carriage disassembly). Items should be soaked for a few seconds and then wiped off. You can also use the paintbrush to get the solution into difficult areas. Disassembly of the plastic lid from the carriage is done by loosening the brass coloured screws. 

For needles, use surgical spirits with a few drops of oil in a jar. Soak needles for an hour. You can clean needles in situ - when the retainer bar removed, wipe in HOLD with the cleaning fluid, push them down and put them back into position and clean off.

Use a clean paintbrush dipped in the oil/spirit solution to clean the front rail. You can also use cotton buds dipped in the solution to clean small, tight areas eg rails, slots on the underside of the carriage. 

If you are doing a full clean, use a cat tail brush to clean out the retainer bar slot. If you put a small 90 degree bend in the handle end of the brush, you can use it to retract the brush easily by winding it back out. 

Knitmaster drums: use WD40 to loosen seized drums (this was the only time he would use WD40). 

Plastic parts: Flash all purpose cleaner is fine for plastic parts

The carriage underside: apply the gun oil to the two large cams. Rub it into the grooves using your fingers. Oil the front and rear rails. 

Passap jaws: apply surgical spirit with the jaws open. Passaps take 6 to 8 hours to service. Brush out the needle slots with surgical spirit only and a toothbrush. When all has been cleaned, replace the middle 40 needles on both beds, set to N/N and “air knit” for a bit to bed in the needles. Add 10 needles each side on both beds, repeat until all needles are back in place. Repeat this with the pushers. Set front and back beds to alternate the pushers every row. 


Monday, May 21, 2018

Knitmaster carriage from the underside

I'll state here that this is a bit of a guess - Knitmasters select and knit (or whatever) within the carriage, there is no needle preselection - so they are less obvious than Brothers. Hopefully these pictures will help anyone having problems with their carriage. Click on one to embiggen. This is a punchcard carriage with side levers.

Needles in A (non-working) position
Needles in B (working) position
Needles in C position
Needles in D (Hold) position

neutral
Plain (0) position

lace
Lace (punchlace?)

slip
Slip

tuck
Tuck

fairisle
Fairisle

Disassembly of a Knitmaster carriage

I recently went to help out a returning machine knitter, only to discover the drums on her 326 were stuck solid. With the help of some very useful videos on Youtube, I cleaned the carriage up, and now it appears to be working well (I don't have her machine here). Apart from a rather fiddly bit, when I accidentally disassembled one of the drums, it went well, and I thought I'd document it for future reference.

maint01

Remove the handle by removing the grub screws in the handle indicated by the red arrows. Remove the two screws indicated by the blue arrows. To remove the casing, I turned the tension dial past zero (some machines it's past 10) until it came free. Underneath the tension knob is the cam knob. This has a leaf spring which is what makes it "click" into the different cam positions. You can use a flat-bladed screwdriver to push the spring out of the way, and then the cam lever and plastic casing will come off together.

maint02

Next step is to remove the screws indicated by the red arrows. Squeeze the casing at the blue arrows and the whole lot should pop off.

maint03

Remove the screw and washer at A and disconnnect the wire connector. Remove the two screws and washers and the C shaped plate indicated by B. Remove the two screws to the left of C and rotate the plate (it had the wire spring in it) and there's another screw without a washer here that needs to be removed. Jiggle it a bit to remove the plate. Finally, remove the circlip and washer at D. The two pattern drums should come up together now. If they do not, put an elastic band around the groove of the drum D to hold the feelers in place before loosening the hex nut - otherwise, the drum comes apart - not fatal, just annoying! I would recommend you only disassemble one half at a time so you can see what goes where!

In my case, three of the drums were frozen solid on the shaft. I prized it off carefully, and gave it a good clean with surgical spirit.

Assembly is done in the reverse order. Don't forget to pop the spring back onto the two wires (top of picture, above A). The drums should spin with a flick of the finger.

Many thanks to Roberta Rose Kelly and "Ask Jack" for their very helpful videos, linked below.

Ask Jack - servicing the drums
Roberta Rose Kelley - removing the cover

Tuesday, September 25, 2012

Machine maintenance day, 22nd September

A machine maintenance day was advertised on the Guild forum, so I signed up for it. Although I'm a mechanical engineer and not averse to repairing things, knitting machines have always made me somewhat nervous, owing to the brittleness of 1980s plastic. I've never progressed further than taking the back cover off - actually, that was because there's an annoying gap in the SK840 which is the perfect size to eat double-ended bodkins. So when this day was advertised, I jumped at the chance to take part. It was being organised by fellow RO for Northamptonshire, Wendy Piper, also known as Knits n' Bits on Ebay.

Well, the satnav confused me somewhat and took me on a mini-tour of the village - why Ms Garmin can't admit defeat (or admit I missed the turning) and tell me to turn around, I don't know - but I soon identified the building we were in because there was a machine table sitting outside. It was to be held in refurbished stables which have underfloor heating - I'd expected to be a bit chilly first thing, but as it turned out we were toasty all day!

There were ten tables laid out with cloths, screwdrivers and cotton buds, and each table had a tray underneath (this gave me visions of oil-changes and the leaky cars in the Coventry Road Transport museum). It turned out to be a receptacle for all the plastic parts, which got a good wash.

DSCN0553
My machine, ready for disassembly.

DSCN0555
Getting ready to clean up.

We had nine Brothers (some electronic) and a rogue Toyota. It was actually quite easy to get the plastic ends and covers off the machine, and get the covers off the carriages - the electronic machines weren't completely disassembled where the printed circuit boards were mounted - and the needles were quickly removed for a sonic wash. Wendy's hubby Ged was in charge of the sonic cleaner, and then he was also the man with the compressed air - each machine got a good blasting outside. Luckily we had lovely weather on the Saturday. We all took packed lunches, but there were some cakes and biscuits and plenty of tea and coffee on offer.

DSCN0570
Ged, hard at work!

The needles were popped into a plastic bag with a good squirt of Ballistol (we had numbered tubs so that we all got our own needles back) and we set about washing the plastic parts, drying them with a hairdryer and then reassembling the machines. Whilst my machine was apart (a KH881 I use for demos - it's hardly been used) I cleaned up the knitleader buttons, one of which kept jamming because the grease under it had set hard. I also got a first-hand view of the mythical "oil strip" that came with early Brother machines - a plastic-backed strip of foam, soaked in oil, that laid under the needles, in order to lubricate them. This was later discarded as providing no useful purpose and actually adding crumbled foam into places hard to clean!

DSCN0566
A naked carriage on a naked machine!

It was interesting to see that the lady behind me had a KH950i, but her sinker plate had a slightly different design to the one on my machine at home. It also surprised me how many different (but almost the same!) screws Brother saw fit to use on these machines - I'm sure if they were manufactured today, there would have been some standardisation in this area. As it was, it was a kind of "Krypton Factor" game - screws were reinserted by a process of elimination. I managed not to have any left over, but I was lucky. The owner of the Toyota had everyone scratching their heads, as things had gone flying off when it was opened, and nobody was quite sure how it went back together.

DSCN0575
Trying to figure out what went where - I seem to have finished mine (foreground)

As there was a bit of a delay waiting to get "blasted" (machines, carriages and brushes all got the treatment) it was lucky that Wendy had brought a few boxes of yarn and books for sale. I picked up some Inex skirt books and a very interesting Montse Stanley book about embroidering on knitwear. Yes, I was good and stepped away from the yarn, although I did look at it!

We ran over to about 5pm and all helped each other get needles back into place, which is somewhat time consuming. Everyone went home with a lovely shiny clean machine. It was a very useful day, and I hope perhaps there will be a Knitmaster-centric one in the future - although if I take the fine gauge, it might well take all week to get the needles out as there are 250 of them! :)

Many thanks to Wendy and Ged for organising it.