
There are some pictures here - took a picture of the handle positions at 12, 3, 6 and 9 o'clock. Not the easiest thing to photograph on a grey, wet day! Also made a short video
These instructions are based on a manual linker, I do not have any information about electric linkers. I did some sketches of my linker as it's rather hard to photograph.
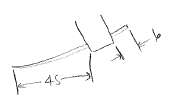
1. The needle should be set so that 6mm protrudes from the back, and approx. 45mm protrudes from the front. The needle should curve down and to the left/right. If it were possible to view the needle from directly above, it would appear to be straight. If it is not straight it will not work properly.
2. The needle goes in and out directly above the groove in the linker point. There is a small gap of about 0.5mm to 1mm here.
3. The looper should be set so that it is almost horizontal. Mine appears to be perhaps 1 degree higher at the working end. The point of the looper is to the top. The looper arm is about 12mm out of its socket. 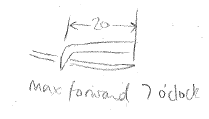

4. When the needle is fully extended (handle approx. 7 o'clock), the overlap between looper and needle is approx. 20mm. The vertical gap at this point is approx. 1mm
Advice for setting up - set the needle as in (1), then adjust the looper, there is lots more room to adjust the looper.
Continuing slowly onwards with Blusa and Kimi. Trying out a Clover soft-touch hook - not sure how I feel yet!
 happy
happy

 hot
hot