
I found these written up on a scrap of paper, I suspect someone presented these at Metropolitan Dream Week but I've no idea now who it was, so apologies if anyone wants to claim copyright on them (though I'm not sure you can copyright a technique anyway). The first three are joined as you knit.
Cable edging (start at RHS of bed if right-handed):
Use 3 prong tool to hang edge of item, RS facing away from you, knit 4 rows. Use 3 prong tool to hang next 3 along edge, K4 rows. *Place end 3sts on RHS onto 3 rem. sts (ie move them left), use 3 prong tool to hang next 3 along edge, K4 rows. Repeat from * to end. Remember to work extra rows if turning a corner. If you run out of bed, use the three prong tool to remove the work and rehang on the RHS to continue. Cast off, steam.

Cable join:
Cast on 4 sts, K2 rows. RC000. Hang edge of first piece using single prong transfer tool on the opposite side from the carriage, WS facing you, K1 row. Hang edge of second piece at the other end, K1 row. Repeat until RC010. Work cable over the 4sts (2 over 2), hang next edge, repeat. Cable is worked every 10 rows. You could experiment by casting on more stitches and still working the cable in the middle (perhaps leaving a needle out of work each side of the central 4 to make the cable stand out more).
Simple lace edge:
CO 5sts. * Using 3 prong tool, move centre 3 sts to left by 1 needle, leave empty needle in work. Hang edge, WS facing you. K2 rows. Repeat from *. Cast off, steam flat. Could be useful if the item needs drawing up afterwards eg the top of a bag.

Pie crust edging:
Poke 3 prong tool through edge of knitting, knit 6 rows. * Poke 3 prong tool into next area, hang onto same needles, k6 rows. Repeat from * to end

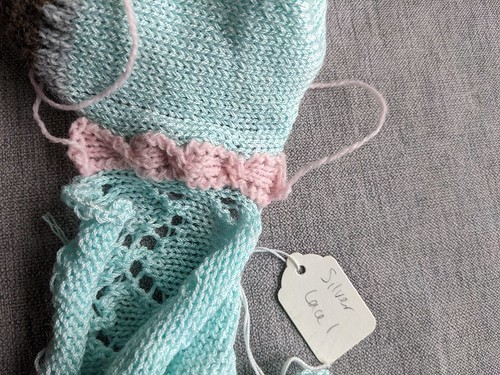
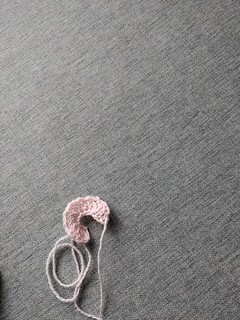
Ruffle (to be sewn on later):
E-wrap cast on 5 stitches or more (adjust to suit taste). Knit two rows. * Transfer end stitch on RHS to its neighbour as if to decrease, but leave the needle in work. Knit 2 rows. Rep from * to desired length. You need to knit A LOT of this! When finished, cast off. Using the latch tool, latch up the edge loops created by the decreased stitch, this will make the knitted strip curl into a ruffle. One to try and see if you like it.
1 comment:
Those are terrific!
Post a Comment