
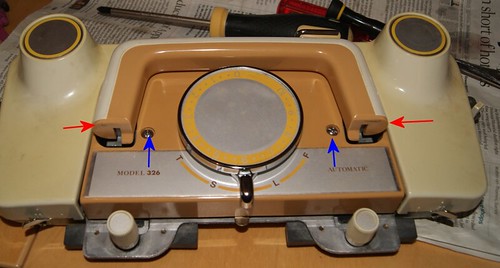
Remove the handle by removing the grub screws in the handle indicated by the red arrows. Remove the two screws indicated by the blue arrows. To remove the casing, I turned the tension dial past zero (some machines it's past 10) until it came free. Underneath the tension knob is the cam knob. This has a leaf spring which is what makes it "click" into the different cam positions. You can use a flat-bladed screwdriver to push the spring out of the way, and then the cam lever and plastic casing will come off together.
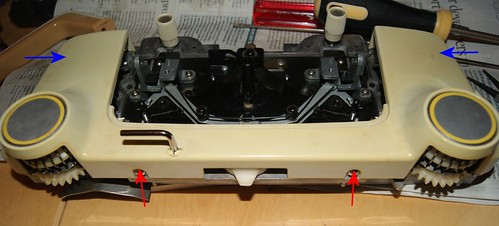
Next step is to remove the screws indicated by the red arrows. Squeeze the casing at the blue arrows and the whole lot should pop off.
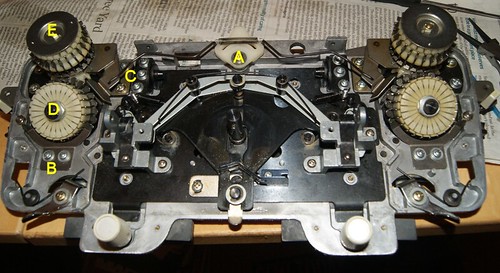
Remove the screw and washer at A and disconnnect the wire connector. Remove the two screws and washers and the C shaped plate indicated by B. Remove the two screws to the left of C and rotate the plate (it had the wire spring in it) and there's another screw without a washer here that needs to be removed. Jiggle it a bit to remove the plate. Finally, remove the circlip and washer at D. The two pattern drums should come up together now. If they do not, put an elastic band around the groove of the drum D to hold the feelers in place before loosening the hex nut - otherwise, the drum comes apart - not fatal, just annoying! I would recommend you only disassemble one half at a time so you can see what goes where!
In my case, three of the drums were frozen solid on the shaft. I prized it off carefully, and gave it a good clean with surgical spirit.
Assembly is done in the reverse order. Don't forget to pop the spring back onto the two wires (top of picture, above A). The drums should spin with a flick of the finger.
Many thanks to Roberta Rose Kelly and "Ask Jack" for their very helpful videos, linked below.
Ask Jack - servicing the drums
Roberta Rose Kelley - removing the cover
No comments:
Post a Comment