
The principle is this - you have all needles in work on the main bed, but only certain needles on the ribber bed - every 4th needle, perhaps. The ribber needles knit up the floats, and keep them under control. Because you are only knitting a few needles on the ribber bed, you can use your 4ply yarns and the tension is pretty much the same as for standard fairisle/stocking stitch, so you can use this for small areas of patterning on a plain sweater. You tend to get faint lines on the public side of the garment - if you are knitting a pattern with lots of verticals you can place these in such as way as to emphasise the verticals.
These instructions are for Brother electronic machines, but it would work on other machines I'm sure. Punchcard machine owners will have to repunch the pattern card for DBJ.
Method:
- Get some stocking stitch established on the machine (MT=8), and end with the carriage on the far left (on the rails, beyond the turn mark). Replace the sinker plate for the ribber arm connector and ribber carriage. Set ribber to slip in both directions, and set to half pitch.
- Install the colour changer. Set the machine to KRC not KH so it will convert the pattern to double bed jacquard. Load your pattern. Press the orange button, this will show you which yarn feeder you should be using. Install the contrast yarn in feeder 2
- Set the carriage to KC1 (3pm) (end needle selection ON) and knit one row in main yarn (MY), COR
- Push both part buttons in, and knit back to the right.
- Select contrast yarn (CY) and set ribber to knit both directions, RT = 4
- Put every 4th needle on the ribber into work (ribber must be at half pitch) - when selecting needles, it's best to work outwards from the centre, and ideally you also want a ribber needle near both ends of the piece; knit 1 row carefully, hang ribber comb and weights, knit 1 row
- Select MY and set ribber to slip in both directions, knit 2 rows
- Select CY and set ribber to knit both directions, knit 2 rows
- Repeat rows 7 & 8 until pattern is completed. Use the 7 hangers as necessary to maintain the weight on the ribber stitches.
- Hang ribber stitches onto corresponding main bed needles, ensuring that they stay IN FRONT of the main yarn stitch so that they do not show through on the front. Drop the ribber bed and replace the sinker plate for stocking stitch and carry on with main yarn only.
Notes:
- I always changed colour and THEN changed the ribber settings - so background, both switches up, knit 2 rows, contrast, both switches down, knit 2 rows.
- KCii works ok for balanced fairisle patterns, but on my machine it would immediately strip the knitting off (from the right hand side) for patterns with large areas of colours. Also, the mesh backing is only attached at the colour changer end, so you would have to catch the right hand side in somehow when making up the garment. KCi works for all patterns so is the preferred "safe" option, plus end needle selection ensures that the mesh is attached at both ends.
- You might find adding the fine knit bar helps. I'm not sure about the end stitch presser plates.
- Knit dbj fairly slowly - you're asking the machine to do a LOT of work, and going too fast will result in errors in the patterning. When I stopped and visually checked every row, the needle selection was perfect.
- The ribber should be set to a higher tension than the main bed - I ended up using T8 on the main and T3 on the ribber bed. It's also worth washing your swatches, because washing revealed some rather unsightly ladders when I was too loose on the ribber. In other words, the knitting had a kind of ribbed effect where the contrast yarn peeked through the knitting in stripes.
- I tried hanging the heels of the previous main yarn row on the ribber, and then had to frog back and rehang after a mistake, and ended up with a neat row of holes in my knitting, hence my suggestion that you allow the machine to create the first row of ribber stitches in the contrast yarn. It might just have been that I should have frogged back another two rows and re-knitted them.
- Another tip - it can be a pain to keep having to restart your knitting when it goes wrong, so consider threading a lifeline through your knitting a few rows before starting this technique. I thread my double-eyed bodkin with ravel cord and thread it through every live stitch on the machine, and then use a clothes peg to peg it out of the way. It can be pulled out later with no effect on the knitting.
- DBJ patterns containing solid lines of colour won't work - there's not enough weight on the ribber and it tends to strip off the machine. So avoid solid lines of one colour in your designs.
Now, this isn't quite the method given in the books. I would have preferred to use that method, because you can keep the ribber set permanently to knit one way, slip the other and you can just concentrate on changing colours every two rows. Every time I tried it, the knitting would strip from the machine from the right hand end. I'm going to have to work on it. It's in the two published books I mentioned above, with pictures of the back - you get ladders where the colours alternate, 1 row black, 1 row white. It's also an industrial technique I've seen on the insides of many supermarket sweaters. So it must be possible - I just haven't quite figured it out yet. My technique gives you a mesh backing made from the contrast yarn only, which keeps the floats under control.
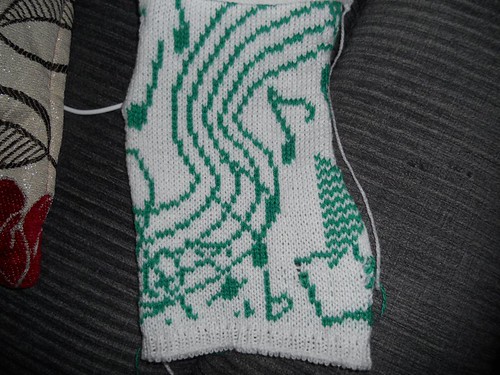
You can see I tried both methods on the swatch below - it's a pre-programmed stitchworld pattern that is unsuitable for fairisle as-is, due to the large areas of white:
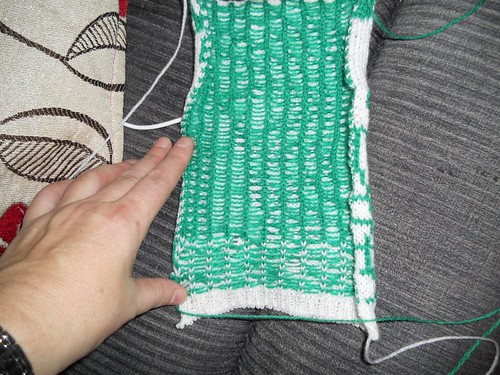
If you look at the right side, you can see small ladders in the first few rows (using the alternate colour backing technique). Using the method detailed above seems to remove these ladders.
You can see I tried both methods on the swatch below - it's a pre-programmed stitchworld pattern that is unsuitable for fairisle as-is, due to the large areas of white:
If you look at the right side, you can see small ladders in the first few rows (using the alternate colour backing technique). Using the method detailed above seems to remove these ladders.
3 comments:
Thank you for detailing your process. I'm just now trying DBJ on my Brother KH930/KR900/KRC830. I've had to refer to my 5 manuals for all 3 pieces of equipment to get a good idea of how to set up the machines. Your tips help to clarify the situation, so, again, THANK YOU!
You're welcome! Glad it was helpful - it's something I plan to revisit myself soon!
Just coming back to this. It's given me some inspiration for incorporating into 4-5 color dbj. I'll let you know how it goes.
--tanya
Post a Comment